
You’ve built an incredible React web app using Lovable’s AI-powered development platform, and now you’re ready to deploy it to your InMotion Hosting shared hosting . This comprehensive guide walks you through the entire process of connecting Lovable to GitHub and deploying your application to any cPanel-based InMotion Hosting server environment using Git version control.
InMotion Hosting’s Shared Hosting, VPS, and Dedicated Server accounts fully support GitHub Actions and remote Git repositories, making it straightforward to deploy your Lovable-created React applications. You’ll learn how to set up the complete pipeline from Lovable’s development environment to your live website, including database migration if your app uses Supabase.
With this guide, you’ll be able to:
- Connect your Lovable project to GitHub for version control
- Set up Git repositories in your InMotion cPanel account
- Configure automatic deployments using GitHub Actions
- Migrate from Supabase to PostgreSQL on InMotion if needed
- Manage ongoing updates and deployments
Let’s get started with the technical setup.
Understanding the Deployment Architecture
Before diving into the setup process, it’s important to understand how the pieces fit together. Lovable creates React applications that run in the browser, but they need to be built and deployed to a web server to be accessible to your users.
Your deployment pipeline will look like this: You develop in Lovable → Changes sync to GitHub → GitHub Actions builds your app → Built files deploy to your InMotion hosting account → Your website goes live.
This architecture gives you the best of both worlds: rapid development with Lovable’s AI assistance and the reliability of professional hosting with InMotion. You maintain full control over your code through GitHub while leveraging automated deployment processes.
InMotion’s Shared Hosting servers run on AlmaLinux 8, which provides excellent compatibility with modern web applications. The platform supports Node.js applications, PostgreSQL databases, and SSH access (on port 2222), giving you everything needed for React app deployment.
Setting Up Lovable GitHub Integration
The first step in your deployment pipeline is connecting Lovable to GitHub. This creates a bridge between your AI-powered development environment and the version control system that will manage your code.
Initial GitHub Connection
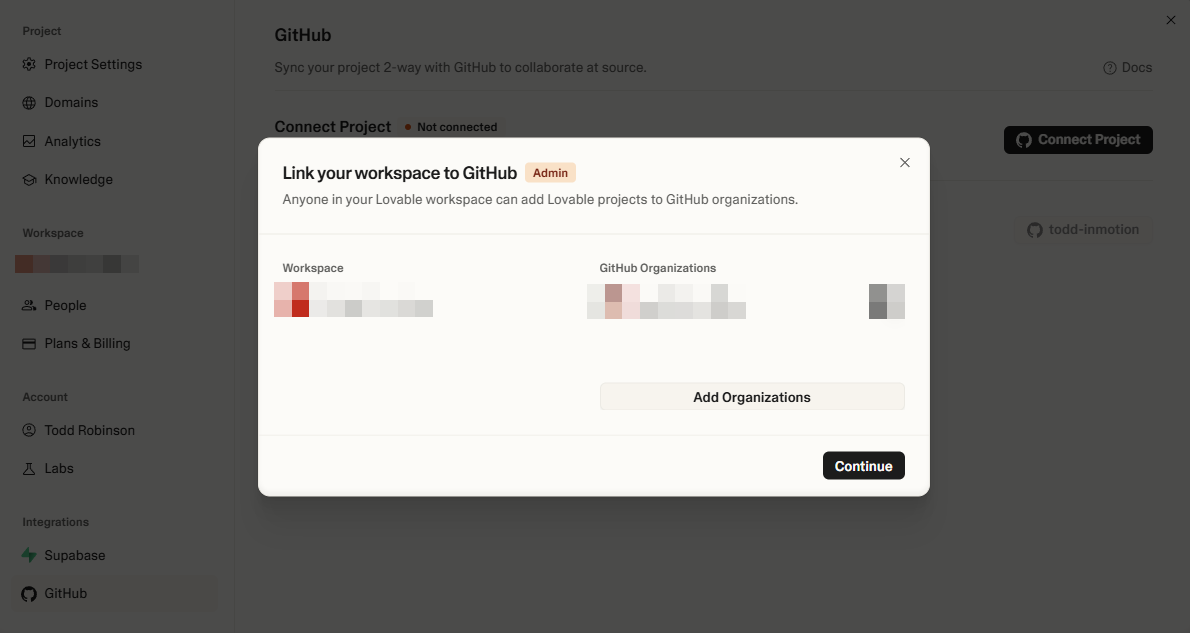
Start by linking your Lovable account to GitHub. In your Lovable project editor, look for the GitHub option in the top-right corner and click “Connect to GitHub.” This initiates the authorization process that allows Lovable to create and manage repositories on your behalf.
When GitHub opens, you’ll be asked to authorize the Lovable GitHub App. Sign in to your GitHub account if you haven’t already. You’ll see options to grant access to all repositories or only select repositories. For simplicity, granting access to all repositories works well, but you can be selective if you prefer to limit access.
If you belong to GitHub organizations, you’ll need to choose which account or organization should host your project’s repository. Make sure you have admin permissions in any organization you select, as Lovable needs to create repositories and manage commits.
Creating Your Project Repository
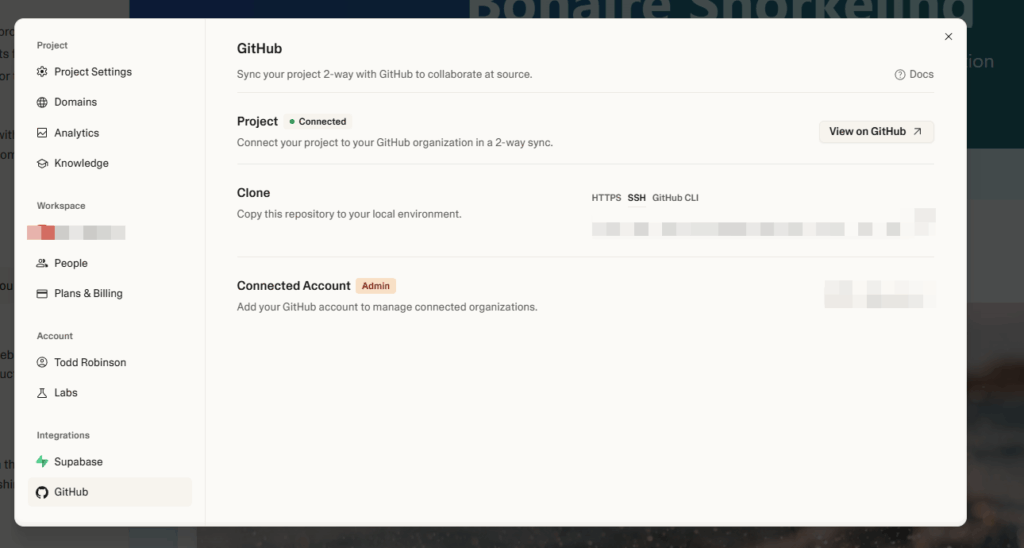
Once GitHub authorization is complete, return to your Lovable project. Click the “Create Repository” button, which should now be visible in the GitHub section of your project interface. Lovable will create a new GitHub repository specifically for your project and perform the initial code push.
This process typically takes a few seconds to complete. Lovable is transferring all your project files, including your React components, configuration files, and any assets you’ve created. Once finished, you’ll see a confirmation message and a link to view your repository on GitHub.
Navigate to your GitHub account to verify the repository creation. You should see a new repository with your project name containing all the code from your Lovable application. This repository will serve as the central hub for your code, connecting Lovable’s development environment to your InMotion hosting account.
Understanding Lovable’s Sync Behavior
Lovable maintains real-time synchronization between your project and GitHub, but this sync operates specifically with your repository’s default branch (typically “main” or “master”). When you make changes in Lovable, they’re automatically committed and pushed to this default branch within seconds.
Similarly, if you push changes to the default branch from your local development environment or directly through GitHub’s interface, Lovable will pull these changes and reflect them in your project editor almost immediately. This bidirectional sync ensures that your code stays consistent whether you’re working in Lovable or using traditional development tools.
However, Lovable only tracks the default branch. If you create feature branches or work on separate branches in GitHub, those changes won’t appear in Lovable until they’re merged into the default branch. This is important to remember when setting up your deployment workflow.
Configuring Git in Your InMotion cPanel Account
With your Lovable project connected to GitHub, the next step is setting up Git Version Control in your InMotion Hosting account with cPanel. This creates the destination for your deployed code and establishes the connection between GitHub and your web server.
Accessing Git Version Control
- Log into your InMotion cPanel account by navigating to
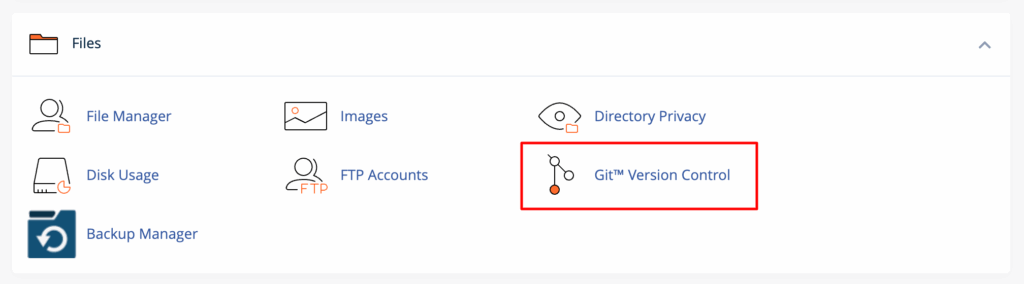
https://yourdomain.com/cpanelor using the cPanel login link in your Account Management Panel. - Navigate to the Files section in your cPanel dashboard. You’ll see several file management options listed in a grid or menu format.
- Click on “Git Version Control” which should appear as an icon with a Git logo. This opens InMotion’s Git management interface where you can create and manage repositories directly on your hosting account.

- Review the initial screen. If this is your first time using Git in cPanel, you’ll be prompted to create a repository immediately and can skip to the next section. Otherwise, you’ll see a list of existing repositories (if any) and a blue “Create” button to add new ones.
Creating Your Deployment Repository
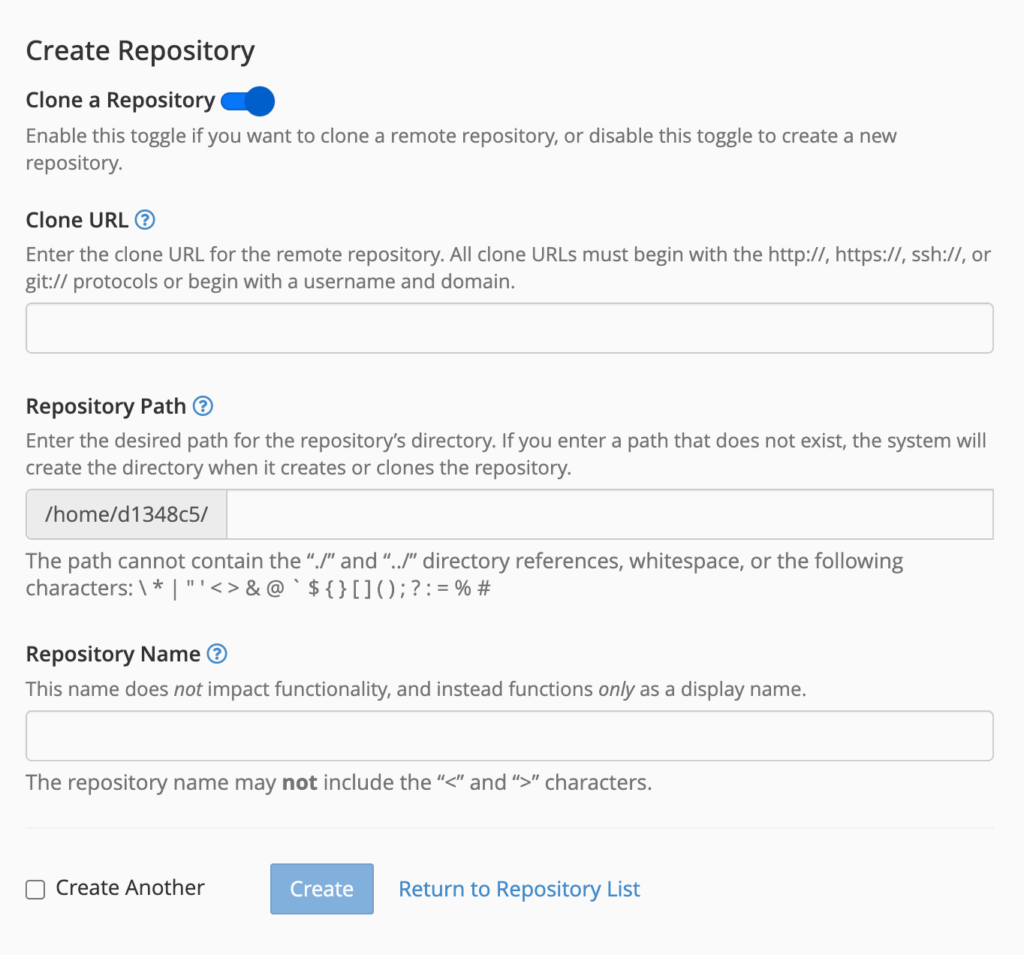
- Click the “Create” button to start setting up your deployment repository. This opens a form with several configuration options.
- Enable repository cloning by toggling ON the “Clone a Repository” option. You’ll see the form change to show fields for cloning an existing repository instead of creating a new empty one.
- Get your GitHub repository’s clone URL by opening your GitHub repository in a new browser tab. Click the green “Code” button and you’ll see options for HTTPS, SSH, and GitHub CLI. Copy the HTTPS URL (it will look like
https://github.com/yourusername/your-repo-name.git). - Enter the clone URL in the “Clone URL” field in cPanel. Paste the HTTPS URL you copied from GitHub. For shared hosting, the HTTPS URL typically works best initially, though you can switch to SSH later for automated deployments.
- Set the repository path to specify where your website files will live on the server. Choose one of these options:
- For your main domain:
public_html/your-app-name - For a subdomain:
public_html/subdomain-name/your-app-name - For a subdirectory:
public_html/directory-name/your-app-name
- For your main domain:
- Provide a repository name that will appear in your cPanel interface. Choose something descriptive like “Lovable React App” or “My Production Website” so you can easily identify it later.
- Click “Create” at the bottom of the form. cPanel will now clone your GitHub repository to your hosting account. This process typically takes 30-60 seconds depending on your repository size.
- Wait for the confirmation message that says “Repository created successfully” or similar. You’ll then see your new repository listed in the Git Version Control interface.

Configuring SSH Access for Shared Hosting
- Generate an SSH key pair on your local machine if you don’t already have one. Open your terminal or command prompt and run:
ssh-keygen -t rsa -b 4096 -C "[email protected]"- You’ll see prompts like this:
Generating public/private rsa key pair.
Enter file in which to save the key (/home/yourusername/.ssh/id_rsa): [Press Enter]
Enter passphrase (empty for no passphrase): [Enter a passphrase or press Enter]
Enter same passphrase again: [Repeat passphrase or press Enter]- View your public key by running:
cat ~/.ssh/id_rsa.pub- This will display your public key, which looks like:
ssh-rsa AAAAB3NzaC1yc2EAAAADAQABAAABgQC7... [email protected]- Copy the entire public key including the ssh-rsa at the beginning and your email at the end.
- Add the SSH key to your cPanel account by navigating to “SSH Access” → “Manage SSH Keys” in your cPanel dashboard.
- Click “Import Key” and paste your public key into the text field. Give it a descriptive name like “My Development Machine” and click “Import.”
- Authorize the key by clicking “Manage” next to your newly imported key, then clicking “Authorize.” You’ll see a confirmation that the key is now authorized.
- Test your SSH connection from your local machine. InMotion’s shared hosting environments must use port 2222:
- If successful, you’ll see:
The authenticity of host '[yourdomain.com]:2222 ([IP_ADDRESS]:2222)' can't be established.

RSA key fingerprint is SHA256:...

Are you sure you want to continue connecting (yes/no)? yes

Warning: Permanently added '[yourdomain.com]:2222' (RSA) to the list of known hosts.

Welcome to yourdomain.com!

[yourusername@server ~]$- Remember the SSH connection format for InMotion shared hosting:
ssh://[email protected]:2222/home/yourusername/repository-pathTesting Your Repository Connection
Once your repository is created in cPanel, test the connection by making a small change to your GitHub repository. You can edit a file directly on GitHub or push a change from your local development environment. The change should appear in your cPanel Git interface within a few minutes.
If changes aren’t syncing properly, check your repository settings in cPanel. Ensure the clone URL is correct and that you have the necessary permissions. You may need to update your repository credentials or re-authenticate with GitHub.
Setting Up PostgreSQL Database (If Needed)
Many Lovable projects use Supabase for their database needs during development. When deploying to InMotion Hosting, you’ll want to migrate to a PostgreSQL database hosted on your account for better performance and control.
Creating a PostgreSQL Database
- Access the PostgreSQL Databases section in your cPanel by navigating to the “Databases” section and clicking on “PostgreSQL Databases.” You’ll see a management interface for creating and managing PostgreSQL databases.
- Create your database by following these detailed steps:
- Locate the “Create New Database” section at the top of the page
- Enter a descriptive database name in the “Database Name” field. Choose something that relates to your project, such as
lovable_app_prod,react_webapp_db, ormyproject_main - Note the full database name that will be created. InMotion automatically prefixes your database name with your cPanel username, so
lovable_app_prodbecomesusername_lovable_app_prod - Click “Create Database” and wait for the system to process your request.
- Confirm database creation by looking for the success message that reads “Added the database username_lovable_app_prod” (or your chosen name). This confirms that your database has been created successfully.
- Click “Go Back” to return to the PostgreSQL Databases main page, where you’ll now see your new database listed in the “Current Databases” section.
Creating Database Users and Permissions
- Create a database user by scrolling down to the “PostgreSQL Users” section:
- Enter a username in the “Username” field. Choose something descriptive like
lovable_app_userorwebapp_user - Generate a strong password by clicking the “Password Generator” button, or create your own secure password with at least 12 characters including uppercase, lowercase, numbers, and symbols
- Confirm your password by entering it again in the “Password (Again)” field
- Click “Create User” to create the database user account
- Enter a username in the “Username” field. Choose something descriptive like
- Record your database credentials immediately after creation. You’ll need these for your application configuration:
Database Host: localhost (or your domain name)
Database Port: 2222
Database Name: username_lovable_app_prod
Database Username: username_lovable_app_user
Database Password: [the password you created]- Grant permissions to your user by scrolling to the “Add User to Database” section:
- Select your database user from the “User” dropdown menu
- Select your database from the “Database” dropdown menu
- Click “Add” to proceed to the permissions screen
- Set user permissions on the permissions page:
- Check “ALL PRIVILEGES” to grant full access to your database user. This allows your application to create tables, insert data, update records, and delete data as needed
- Review the individual permissions if you prefer granular control. For most React applications, you’ll need
SELECT,INSERT,UPDATE,DELETE,CREATE, andDROPpermissions - Click “Make Changes” to save the permissions
- Verify user access by testing the database connection. You can do this through cPanel’s phpPgAdmin interface:
- Navigate to phpPgAdmin in the “Databases” section of cPanel
- Log in using your database credentials
- Select your database from the left sidebar
- Run a test query like
SELECT version();to confirm connectivity
Updating Your Application Configuration
- Locate your application’s database configuration which is typically found in one of these files:
.envor.env.local(environment variables)config/database.js(configuration file)src/lib/database.js(database connection module)
- Replace Supabase configuration with your InMotion PostgreSQL details. Change from:
// Old Supabase configuration
const supabaseUrl = 'https://your-project.supabase.co'
const supabaseKey = 'your-anon-key'
const supabase = createClient(supabaseUrl, supabaseKey)- To PostgreSQL configuration:
// New PostgreSQL configuration
const databaseConfig = {
  host: 'localhost', // or your domain name
  port: 2222,
  database: 'username_lovable_app_prod',
  user: 'username_lovable_app_user',
  password: 'your_secure_password',
  ssl: false // InMotion's shared hosting typically doesn't require SSL for local connections
}- Update environment variables if your application uses them. Create or modify your .env.production file:
# Database Configuration
REACT_APP_DB_HOST=localhost
REACT_APP_DB_PORT=2222
REACT_APP_DB_NAME=username_lovable_app_prod
REACT_APP_DB_USER=username_lovable_app_user
REACT_APP_DB_PASSWORD=your_secure_password

# Application Configuration
REACT_APP_NODE_ENV=production
REACT_APP_API_URL=https://yourdomain.com/api- Test your database connection locally before deploying:
# Install a PostgreSQL client for testing
npm install pg

# Create a test connection script
node -e "
const { Client } = require('pg');
const client = new Client({
  host: 'yourdomain.com',
  port: 2222,
  database: 'username_lovable_app_prod',
  user: 'username_lovable_app_user',
  password: 'your_secure_password'
});
client.connect()
  .then(() => console.log('Database connection successful!'))
  .catch(err => console.error('Database connection failed:', err))
  .finally(() => client.end());
"- Commit your configuration changes to your GitHub repository:
git add .env.production
git add src/config/database.js  # or your specific config file
git commit -m "Update database configuration for InMotion PostgreSQL"
git push origin main- Verify the changes by checking your GitHub repository to ensure the updated configuration files are committed and will be included in your next deployment.
Configuring GitHub Actions for Deployment
GitHub Actions provides the automation that makes your deployment pipeline work seamlessly. You’ll create a workflow that builds your React application and deploys it to your InMotion hosting account whenever you push changes to your main branch.
Creating Your Workflow File
- Navigate to your GitHub repository in your web browser and ensure you’re viewing the main branch.
- Create the workflows directory by clicking on “Create new file” in your repository’s main page.
- Type the file path .github/workflows/deploy.yml in the file name field. GitHub will automatically create the necessary directories when you include the forward slashes.
- Add your workflow configuration by copying and pasting the following complete YAML configuration:
name: Deploy Lovable React App to InMotion Hosting
on:
  push:
    branches: [ main ]
  pull_request:
    branches: [ main ]
jobs:
  deploy:
    runs-on: ubuntu-latest
    steps:
    - name: Checkout code
      uses: actions/checkout@v3
    - name: Setup Node.js environment
      uses: actions/setup-node@v3
      with:
        node-version: '18'
        cache: 'npm'
    - name: Install dependencies
      run: |
        echo "Installing npm dependencies..."
        npm ci
        echo "Dependencies installed successfully"
    - name: Build React application
      run: |
        echo "Building React application for production..."
        npm run build
        echo "Build completed successfully"
        ls -la build/
    - name: Setup SSH key for deployment
      run: |
        echo "Setting up SSH key..."
        mkdir -p ~/.ssh
        echo "${{ secrets.SSH_KEY }}" > ~/.ssh/id_rsa
        chmod 600 ~/.ssh/id_rsa
        ssh-keyscan -p 2222 ${{ secrets.SSH_HOST }} >> ~/.ssh/known_hosts
        echo "SSH key configured successfully"
    - name: Deploy to InMotion Hosting
      run: |
        echo "Starting deployment to InMotion Hosting..."
        rsync -avz --delete --progress
          -e "ssh -p 2222 -o StrictHostKeyChecking=no"
          build/
          ${{ secrets.SSH_USERNAME }}@${{ secrets.SSH_HOST }}:${{ secrets.SSH_PATH }}
        echo "Deployment completed successfully"
    - name: Verify deployment
      run: |
        echo "Verifying deployment..."
        ssh -p 2222 ${{ secrets.SSH_USERNAME }}@${{ secrets.SSH_HOST }} "ls -la ${{ secrets.SSH_PATH }}"
echo "Deployment verification completed"- Review the workflow configuration to understand what each step does:
- Checkout code: Downloads your repository code to the GitHub Actions runner
- Setup Node.js: Installs Node.js version 18 with npm caching for faster builds
- Install dependencies: Runs npm ci to install your project dependencies
- Build React application: Creates the production build of your React app
- Setup SSH key: Configures SSH authentication for secure deployment
- Deploy to InMotion: Uses rsync to transfer files to your hosting account
- Verify deployment: Confirms that files were transferred successfully
- Commit the workflow file by scrolling to the bottom of the page, adding a commit message like “Add GitHub Actions deployment workflow“, and clicking “Commit new file.”
Setting Up Deployment Secrets
- Navigate to your repository settings by clicking on the “Settings” tab in your GitHub repository.
- Access the secrets section by clicking on “Secrets and variables” in the left sidebar, then selecting “Actions.“
- Add your InMotion hosting secrets by clicking “New repository secret” for each of the following: INMOTION_HOST Secret:
- Name: INMOTION_HOST
- Value: yourdomain.com (replace with your actual domain)
- Click “Add secret“
- INMOTION_USERNAME Secret:
- Name: INMOTION_USERNAME
- Value: your_cpanel_username (found in your cPanel login details)
- Click “Add secret“
- INMOTION_SSH_KEY Secret:
- Name: INMOTION_SSH_KEY
- Value: Your private SSH key content (run cat ~/.ssh/id_rsa on your local machine to view it)
- The key should start with —–BEGIN OPENSSH PRIVATE KEY—– and end with —–END OPENSSH PRIVATE KEY—–
- Click “Add secret“
- INMOTION_PATH Secret:
- Name: INMOTION_PATH
- Value: /home/yourusername/public_html/your-app-directory (replace with your actual path)
- Click “Add secret“
- Verify all secrets are added by checking that you see all four secrets listed in your repository secrets page.
Implementing the Deployment Step
- Understand the rsync command used in the deployment step:
rsync -avz --delete --progress
  -e "ssh -p 2222 -o StrictHostKeyChecking=no"
  build/
[email protected]:/home/username/public_html/your-app/- Break down the rsync options:
-a: Archive mode (preserves permissions, timestamps, etc.)-v: Verbose output (shows files being transferred)-z: Compress data during transfer (faster over network)--delete: Remove files on destination that don’t exist in source--progress: Show transfer progress-e "ssh -p 2222": Use SSH on port 2222 for transfer-o StrictHostKeyChecking=no:Skip SSH host key verification
- Customize the deployment path by updating the INMOTION_PATH secret to match your specific hosting setup:
- Main domain: /home/yourusername/public_html
- Subdomain: /home/yourusername/public_html/subdomain
- Subdirectory: /home/yourusername/public_html/directory
Testing Your Deployment Workflow
- Make a test change to your repository by editing a file (like updating the README.md or making a small change to your React app).
- Commit and push the change to your main branch:
git add .
git commit -m "Test deployment workflow"
git push origin main- Monitor the workflow execution by navigating to the “Actions” tab in your GitHub repository. You should see a new workflow run starting with the name “Deploy Lovable React App to InMotion Hosting.”
- Click on the workflow run to see detailed logs. You’ll see output like:
Run npm ci

Installing npm dependencies...

npm WARN prepare removing existing node_modules

added 1234 packages in 45s

Dependencies installed successfully

Run npm run build

Building React application for production...

> [email protected] build

> react-scripts build

Creating an optimized production build...

Compiled successfully.

File sizes after gzip:

  123.45 KB  build/static/js/main.abc123.js
  12.34 KB   build/static/css/main.def456.css

Build completed successfully- Check the deployment step output for successful file transfer:
Run rsync -avz --delete --progress...

Starting deployment to InMotion Hosting...

building file list ... done

./

asset-manifest.json
       1,234 100%    0.00kB/s    0:00:00 (xfr#1, to-chk=25/27)

favicon.ico
       3,456 100%    3.29MB/s    0:00:00 (xfr#2, to-chk=24/27)

index.html
       2,345 100%    2.24MB/s    0:00:00 (xfr#3, to-chk=23/27)

sent 567,890 bytes  received 1,234 bytes  379,416.00 bytes/sec

total size is 567,890  speedup is 1.00

Deployment completed successfully- Verify deployment success by checking that your website is accessible at your domain and that all functionality works correctly.
- Troubleshoot any failures by examining the error logs in the GitHub Actions interface. Common issues and their solutions:
- SSH connection failures: Check your SSH key format and ensure it’s properly formatted in the secret
- Permission denied errors: Verify your SSH key is authorized in cPanel
- Build failures: Check your package.json for missing dependencies
- Rsync errors: Confirm your deployment path is correct in the INMOTION_PATH secret
Managing the Lovable to Main Branch Workflow
Lovable typically creates its own branch for development work, separate from your main branch. To deploy changes from Lovable to your live website, you’ll need to merge these changes into your main branch, which then triggers your deployment workflow.
Understanding Branch Structure
When Lovable connects to GitHub, it often creates a branch called “lovable” or similar for its development work. This keeps Lovable’s AI-generated changes separate from your main branch until you’re ready to deploy them. Your GitHub Actions workflow is configured to deploy only from the main branch, so you control when changes go live.
This branching strategy gives you the opportunity to review Lovable’s changes before they’re deployed to your live website. You can test functionality, make additional modifications, or even revert changes if needed.
Manual Merge Process
- Check your repository’s branch structure by navigating to your GitHub repository homepage and clicking on the branch dropdown (usually shows “main” by default). You should see your main branch and the Lovable development branch (often named “lovable” or similar).
- Review recent commits on the Lovable branch:
- Click on the Lovable branch to switch to it
- Examine recent commits by clicking on the commit history. You’ll see entries like:
Update component styling and layout
Add new user authentication features
Fix database connection issues
Implement responsive design improvements- Review the changes by clicking on individual commits to see what code was modified
- Create a pull request to merge Lovable changes into your main branch:
- Click “Pull requests” in the top navigation of your repository
- Click “New pull request” (green button on the right)
- Set the base branch to “main” using the dropdown on the left
- Set the compare branch to your Lovable branch using the dropdown on the right
- Review the pull request preview which shows you:
Able to merge. These branches can be automatically merged.
Showing 15 changed files with 234 additions and 67 deletions.- Examine the code changes in detail:
- Scroll through the “Files changed” tab to see exactly what modifications were made
- Look for critical changes like:
- Database configuration updates
- New component additions
- Styling modifications
- API endpoint changes
- Add comments on specific lines if you notice issues that need attention
- Add a descriptive pull request title and description:
- Title example: “Deploy latest Lovable updates – authentication and UI improvements”
- Description example:
This PR includes the following updates from Lovable:

- New user authentication system
- Improved responsive design
- Database connection optimizations
- UI component updates

Ready for production deployment.- Merge the pull request once you’re satisfied with the changes:
- Click “Merge pull request” (green button)
- Choose your merge strategy:
- Create a merge commit: Preserves the branch history
- Squash and merge: Combines all commits into one clean commit
- Rebase and merge: Replays commits without creating a merge commit
- Click “Confirm merge” to complete the process
- Monitor the automatic deployment that triggers after merging:
- Navigate to the “Actions” tab immediately after merging
- Click on the latest workflow run that should be starting
- Watch the deployment progress in real-time:
Checkout code
Setup Node.js environment
Install dependencies
Build React application
Setup SSH key for deployment
Deploy to InMotion Hosting- Verify deployment success by checking your live website:
- Visit your domain in a web browser
- Test key functionality that was updated
- Check browser console for any JavaScript errors
- Test on mobile devices if responsive changes were made
Alternative: Command Line Merge Process
If you prefer working from the command line, you can merge branches locally:
- Clone your repository if you haven’t already:
git clone https://github.com/yourusername/your-repo-name.git
cd your-repo-name- Fetch all branches from your remote repository:
git fetch origin- List all branches to see your available branches:
git branch -a- Output:
* main
  remotes/origin/main
remotes/origin/lovable- Switch to your main branch:
git checkout main- Pull the latest changes from the remote main branch:
git pull origin main- Merge the Lovable branch into main:
git merge origin/lovable- If the merge is successful, you’ll see:
Auto-merging src/components/UserProfile.js
Auto-merging src/styles/main.css
Merge made by the 'recursive' strategy.
15 files changed, 234 insertions(+), 67 deletions(-)
create mode 100644 src/components/NewFeature.js- Push the merged changes to trigger deployment:
it push origin main- Handle merge conflicts if they occur:
# If you see a message like:
# Auto-merging src/config/database.js
# CONFLICT (content): Merge conflict in src/config/database.js
# Automatic merge failed; fix conflicts and then commit the result.
# Edit the conflicted files to resolve conflicts
nano src/config/database.js

# Look for conflict markers and resolve them:
# <<<<<<< HEAD
# Your current code
# =======
# Lovable's code
# >>>>>>> origin/lovable
# After resolving conflicts, add the files
git add src/config/database.js

# Complete the merge
git commit -m "Merge lovable branch with conflict resolution"

# Push the changes
git push origin mainSetting Up Automated Merges (Optional)
For a more streamlined workflow, you can configure automatic merging from the Lovable branch to main under certain conditions. This requires setting up additional GitHub Actions workflows that monitor the Lovable branch and create pull requests automatically.
However, this approach requires careful consideration. Automatic merges mean that Lovable’s changes deploy immediately without human review. This can be convenient for solo developers but may not be appropriate for applications where code review is important.
If you choose to implement automatic merges, consider adding automated testing to your workflow. This ensures that code changes pass basic functionality tests before being deployed to your live website.
Configuring Your React App for Production
Your React application needs specific configuration adjustments to work correctly in the InMotion hosting environment. These changes ensure that your app loads properly, handles routing correctly, and connects to your production database.
Building for Production
React applications need to be built for production to achieve optimal performance and compatibility. Your GitHub Actions workflow handles this through the npm run build command, which creates optimized, minified files ready for deployment.
Verify that your package.json file includes the correct build script. Most React applications use react-scripts build or a similar command. If your Lovable project uses a different build system, adjust your workflow accordingly.
The build process creates a build directory containing all the files needed for your live website. These files are what get deployed to your InMotion hosting account, not your source code. This means your live website contains only the compiled, optimized version of your application.
Handling Client-Side Routing
If your React application uses client-side routing (React Router), you’ll need to configure your web server to handle route requests correctly. When users navigate to different pages in your app, the web server needs to serve your React application instead of trying to find physical files.
Create a .htaccess file in your project’s public directory with the following content:
Options -MultiViews
RewriteEngine On
RewriteCond %{REQUEST_FILENAME} !-f
RewriteRule ^ index.html [QSA,L]This configuration tells Apache to serve your index.html file for any request that doesn’t match an existing file. This allows React Router to handle navigation on the client side while ensuring that direct links to your app’s routes work correctly.
Environment Variables and Configuration
Your production application needs a different configuration than your development environment. Database connections, API endpoints, and other settings should be optimized for your InMotion hosting environment.
React applications typically use environment variables for configuration. Create a .env.production file in your project root with production-specific settings. These variables will be used automatically when your application is built for production.
Common production environment variables include:
- Database connection strings
- API endpoint URLs
- Feature flags or configuration options
- Third-party service keys
Remember that React environment variables must be prefixed with REACT_APP_ to be available in your application code. Variables without this prefix are not included in the production build.
Optimizing Performance
InMotion’s shared hosting environment performs well, but you can optimize your React application for even better performance. Enable gzip compression by adding appropriate headers to your .htaccess file:
<IfModule mod_deflate.c>
    AddOutputFilterByType DEFLATE text/plain
    AddOutputFilterByType DEFLATE text/html
    AddOutputFilterByType DEFLATE text/xml
    AddOutputFilterByType DEFLATE text/css
    AddOutputFilterByType DEFLATE application/xml
    AddOutputFilterByType DEFLATE application/xhtml+xml
    AddOutputFilterByType DEFLATE application/rss+xml
    AddOutputFilterByType DEFLATE application/javascript
    AddOutputFilterByType DEFLATE application/x-javascript
</IfModule>This configuration compresses your application files before serving them to users, reducing load times and bandwidth usage.
Troubleshooting Common Deployment Issues
Even with careful setup, you might encounter issues during deployment. Here are the most common problems and their detailed solutions.
Build Failures
- Identify build failure symptoms by checking your GitHub Actions workflow logs. You’ll see error messages like:
Run npm run build
Building React application for production...

> [email protected] build
> react-scripts build

Creating an optimized production build...
Failed to compile.
Module not found: Can't resolve 'some-missing-package' in '/home/runner/work/my-app/my-app/src'- Check for missing dependencies by comparing your local package.json with your repository:
# On your local machine, list all installed packages
npm list --depth=0

# Compare with your package.json dependencies
cat package.json | grep -A 20 '"dependencies"'- Fix missing dependencies by installing them locally and updating your repository:
# Install missing packages
npm install missing-package-name

# Verify the package.json is updated
git diff package.json

# Commit the changes
git add package.json package-lock.json
git commit -m "Add missing dependencies"
git push origin main- Resolve Node.js version conflicts by checking your local Node.js version:
# Check your local Node.js version
node --version

# Output: v18.17.0
# Update your GitHub Actions workflow to match
# Edit .github/workflows/deploy.yml and change:
node-version: '18' # Match your local version- Test the build locally before pushing to GitHub:
# Clean install dependencies
rm -rf node_modules package-lock.json
npm install

# Run the build command
npm run build

# Check if build directory is created
ls -la build/Deployment Connection Issues
- Diagnose SSH connection problems by testing your connection manually:
# Test SSH connection to your InMotion account
ssh -p 2222 [email protected]- SSH error – Connection refused:
ssh: connect to host yourdomain.com port 2222: Connection refusedSolution: Verify your domain name and ensure SSH is enabled in cPanel.
- SSH error – Permission denied:
[email protected]: Permission denied (publickey).Solution: Check your SSH key configuration:
# Verify your SSH key exists
ls -la ~/.ssh/id_rsa*

# Check your SSH key is properly formatted
head -1 ~/.ssh/id_rsa

# Should show: -----BEGIN OPENSSH PRIVATE KEY-----

# Test SSH key authentication
ssh -p 2222 -i ~/.ssh/id_rsa [email protected]- Fix GitHub Actions SSH key issues:
# On your local machine, display your private key
cat ~/.ssh/id_rsa

# Copy the ENTIRE key including the BEGIN and END lines
# Update your GitHub secret INMOTION_SSH_KEY with this content- Verify rsync command syntax by testing it manually:
# Test the rsync command from your local machine
rsync -avz --dry-run --delete
  -e "ssh -p 2222 -o StrictHostKeyChecking=no"
  ./build/

[email protected]:/home/yourusername/public_html/your-app/

Expected output:
building file list ... done

./
index.html
static/
static/css/
static/css/main.abc123.css
static/js/
static/js/main.def456.js

sent 1,234 bytes  received 56 bytes  516.00 bytes/sec

total size is 567,890  speedup is 440.38 (DRY RUN)
File Permission Problems
- Check file permissions on your hosting account:
# SSH into your InMotion account
ssh -p 2222 [email protected]

# Check permissions on your web directory
ls -la /home/yourusername/public_html/your-app/
Expected output:
drwxr-xr-x  3 yourusername yourusername  4096 Oct 15 10:30 .
drwxr-xr-x  8 yourusername yourusername  4096 Oct 15 10:25 ..
-rw-r--r--  1 yourusername yourusername  1234 Oct 15 10:30 index.html
drwxr-xr-x 2 yourusername yourusername 4096 Oct 15 10:30 static- Fix incorrect file permissions:
# Set correct permissions for directories (755)
find /home/yourusername/public_html/your-app/ -type d -exec chmod 755 {} ;

# Set correct permissions for files (644)
find /home/yourusername/public_html/your-app/ -type f -exec chmod 644 {} ;

# Verify permissions are correct
ls -la /home/yourusername/public_html/your-app/- Update your GitHub Actions workflow to set permissions automatically:
- name: Deploy to InMotion Hosting

  run: |

    echo "Starting deployment to InMotion Hosting..."

    rsync -avz --delete --progress

      --chmod=D755,F644

      -e "ssh -p 2222 -o StrictHostKeyChecking=no"

      build/

      ${{ secrets.SSH_USERNAME }}@${{ secrets.SSH_HOST }}:${{ secrets.SSH_PATH }}

echo "Deployment completed successfully"Database Connection Errors
- Test database connectivity from your hosting account:
# SSH into your InMotion account
ssh -p 2222 [email protected]

# Test PostgreSQL connection
psql -h localhost -p 2222 -U yourusername_dbuser -d yourusername_dbname
Successful connection output:
Password for user yourusername_dbuser: [enter your password]

psql (13.7)

Type "help" for help.

yourusername_dbname=> SELECT version();

version

----------------------------------------------------------------------------------------------------

PostgreSQL 13.7 on x86_64-pc-linux-gnu, compiled by gcc (GCC) 8.5.0 20210514 (Red Hat 8.5.0-4)

(1 row)

yourusername_dbname=> q- Database Error – Connection refused:
psql: error: connection to server at "localhost" (127.0.0.1), port 2222 failed: Connection refusedSolution: Check that PostgreSQL is running and your database exists in cPanel.
- Database Error – Authentication failed:
psql: error: connection to server at "localhost" (127.0.0.1), port 2222 failed: FATAL: password authentication failed for user "yourusername_dbuser"Solution: Verify your database username and password in cPanel.
- Test database connection from your application:
# Create a test script on your hosting account
cat > test_db_connection.php << 'EOF'

<?php
$host = 'localhost';
$port = '2222';
$dbname = 'yourusername_dbname';
$user = 'yourusername_dbuser';
$password = 'your_password';
$dsn = "pgsql:host=$host;port=$port;dbname=$dbname";

try {
    $pdo = new PDO($dsn, $user, $password);
    echo "Database connection successful!n";
    $stmt = $pdo->query('SELECT version()');
    $version = $stmt->fetchColumn();
    echo "PostgreSQL version: $versionn";

} catch (PDOException $e) {
    echo "Database connection failed: " . $e->getMessage() . "n";
}
?>

EOF

# Run the test script
php test_db_connection.php- Update your application’s database configuration with the correct connection parameters:
// In your React app's environment variables

REACT_APP_DB_HOST=localhost
REACT_APP_DB_PORT=2222
REACT_APP_DB_NAME=yourusername_dbname
REACT_APP_DB_USER=yourusername_dbuser
REACT_APP_DB_PASSWORD=your_secure_password

// Test the connection in your application

console.log('Database config:', {
  host: process.env.REACT_APP_DB_HOST,
  port: process.env.REACT_APP_DB_PORT,
  database: process.env.REACT_APP_DB_NAME,
  user: process.env.REACT_APP_DB_USER
});Advanced Troubleshooting Commands
- Monitor your deployment in real-time:
# Watch GitHub Actions workflow progress
# (Install GitHub CLI: https://cli.github.com/)
gh run watch

# View detailed logs
gh run view --log- Debug SSH connection issues:
# Test SSH connection with verbose output
ssh -p 2222 -v [email protected]

# Test SSH key specifically
ssh -p 2222 -i ~/.ssh/id_rsa -v [email protected]- Verify your deployed files:
# SSH into your hosting account
ssh -p 2222 [email protected]

# Check deployed files
ls -la /home/yourusername/public_html/your-app/

# Verify file contents
head -10 /home/yourusername/public_html/your-app/index.html

# Check file timestamps
find /home/yourusername/public_html/your-app/ -type f -exec ls -la {} ;
Updating Your Deployed Application
Once your initial deployment is complete, you’ll need to manage ongoing updates as you continue developing your application in Lovable. This process becomes routine once you understand the workflow.
Development Workflow
Your typical development cycle will involve making changes in Lovable, which automatically sync to your Lovable branch on GitHub. When you’re ready to deploy updates, you’ll merge the Lovable branch into your main branch, triggering an automatic deployment.
Monitor your GitHub repository to see when Lovable pushes new changes. You’ll receive notifications about commits, and you can review the changes before deciding to deploy them.
Consider implementing a staging environment where you can test changes before deploying to your live website. This gives you an additional layer of quality control and helps catch issues before they affect your users.
Rollback Procedures
If a deployment causes issues on your live website, you need a quick way to revert to a previous version. GitHub maintains a complete history of your code, making rollbacks straightforward.
To rollback, identify the last known good commit in your main branch. Create a new branch from this commit, then merge it back into main. This will trigger a new deployment with your previous code.
Alternatively, you can revert specific commits using GitHub’s interface. Navigate to the problematic commit and click “Revert” to create a new commit that undoes the changes.
Monitoring Deployments
Keep track of your deployments by monitoring the GitHub Actions workflow results. Failed deployments should be investigated immediately to prevent your website from becoming out of sync with your code.
Set up notifications for workflow failures so you’re alerted when deployments don’t complete successfully. GitHub can send email notifications or integrate with Slack and other communication tools.
Consider adding health checks to your deployment workflow. These can verify that your website is accessible and functioning correctly after each deployment.
High-Level Process Summary
Here’s the complete process for deploying updates to your Lovable application:
Initial Setup (One-Time Configuration)
- Connect Lovable to GitHub:
- Access your Lovable project editor
- Click “GitHub” → “Connect to GitHub” in the top-right corner
- Authorize the Lovable GitHub App with appropriate permissions
- Select your GitHub account or organization
- Click “Create Repository” to establish the connection
- Verify the repository appears in your GitHub account
- Configure InMotion cPanel Git Repository:
- Log into your InMotion cPanel account
- Navigate to “Files” → “Git Version Control”
- Click “Create” and toggle “Clone a Repository”
- Enter your GitHub repository’s HTTPS clone URL
- Set repository path (e.g., public_html/your-app-name)
- Provide a descriptive repository name
- Click “Create” and wait for completion
- Set up SSH authentication:
- Generate SSH key pair on your local machine: ssh-keygen -t rsa -b 4096
- Copy your public key: cat ~/.ssh/id_rsa.pub
- Add the public key to cPanel under “SSH Access” → “Manage SSH Keys”
- Test SSH connection: ssh -p 2222 [email protected]
- Create PostgreSQL database (if needed):
- Navigate to “Databases” → “PostgreSQL Databases” in cPanel
- Create new database with descriptive name
- Create database user with strong password
- Grant all privileges to the user for the database
- Update your application’s database configuration
- Configure GitHub Actions workflow:
- Create .github/workflows/deploy.yml in your repository
- Set up the complete workflow with build and deployment steps
- Configure repository secrets in GitHub Settings:
- INMOTION_HOST: Your domain name
- INMOTION_USERNAME: Your cPanel username
- INMOTION_SSH_KEY: Your private SSH key content
- INMOTION_PATH: Path to your web directory
- Test the complete pipeline:
- Make a test commit to your main branch
- Monitor the GitHub Actions workflow execution
- Verify files are deployed correctly to your hosting account
- Test your live website functionality
Regular Update Process
- Develop in Lovable:
- Use Lovable’s AI-powered development environment to make changes
- Add new features, fix bugs, or modify your application
- Lovable automatically commits changes to your GitHub repository’s development branch
- Monitor GitHub repository:
- Check your GitHub repository for new commits from Lovable
- Review commit messages to understand what changes were made
- Example commit messages you might see:
feat: Add user profile management interface
fix: Resolve database connection timeout issues
style: Update responsive design for mobile devices
refactor: Improve component organization and structure- Review changes before deployment:
- Navigate to your repository and switch to the Lovable branch
- Click on recent commits to see detailed code changes
- Look for potential issues or conflicts
- Consider testing changes in a staging environment if available
- Create and review pull request:
- Click “Pull requests” → “New pull request”
- Set base branch to “main” and compare branch to your Lovable branch
- Review the “Files changed” tab to see all modifications
- Add descriptive title and comments
- Example pull request descriptions:
Deploy Update: User Authentication & UI Improvements

Changes include:
- New user login/registration system
- Improved dashboard layout
- Mobile-responsive navigation
- Database query optimizations

Tested functionality:
- User registration flow
- Login/logout process
- Dashboard responsiveness
- Database connections- Merge and deploy:
- Click “Merge pull request” after review
- Choose merge strategy (merge commit, squash, or rebase)
- Click “Confirm merge” to complete the process
- GitHub Actions automatically triggers deployment workflow
- Monitor deployment progress:
- Navigate to “Actions” tab immediately after merging
- Click on the latest workflow run
- Watch each step complete:
Checkout code (15s)
Setup Node.js environment (22s)
Install dependencies (1m 34s)
Build React application (2m 12s)
Setup SSH key for deployment (8s)
Deploy to InMotion Hosting (1m 45s)
Verify deployment (12s)- Verify deployment success:
- Visit your live website URL
- Test all updated functionality
- Check browser console for JavaScript errors
- Test responsive design on different devices
- Verify database connections are working
- Handle deployment failures (if they occur):
- Check GitHub Actions logs for error messages
- Common issues and quick fixes:
- Build failures: Check package.json dependencies
- SSH connection issues: Verify SSH keys and port 2222
- Permission errors: Check file permissions in deployment script
- Database errors: Verify connection parameters
Emergency Rollback Process
- Identify the issue:
- Determine if the problem is with the latest deployment
- Check error logs and user reports
- Access your website to confirm the issue
- Perform quick rollback:
- Navigate to your GitHub repository
- Go to “Actions” tab and find the last successful deployment
- Click on “Re-run jobs” to redeploy the previous working version
- Alternatively, revert the problematic commit:
git log --oneline  # Find the commit to revert
git revert abc123  # Revert the specific commit
git push origin main # Push the revert commit- Verify rollback success:
- Check that your website is functioning correctly
- Test critical functionality
- Monitor for any remaining issues
Ongoing Maintenance Commands
- Check deployment status:
# SSH into your hosting account
ssh -p 2222 [email protected]

# Check recent deployments
ls -la /home/yourusername/public_html/your-app/

# View file timestamps to confirm latest deployment
find /home/yourusername/public_html/your-app/ -type f -exec ls -la {} ; | head -10- Monitor GitHub Actions usage:
- Check your GitHub Actions usage in repository settings
- Review workflow run history for patterns
- Optimize workflows if needed to reduce build times
- Database maintenance:
# Connect to your PostgreSQL database
psql -h localhost -p 2222 -U yourusername_dbuser -d yourusername_dbname

# Check database size and health
SELECT pg_size_pretty(pg_database_size('yourusername_dbname'));

# View active connections
SELECT * FROM pg_stat_activity WHERE datname = 'yourusername_dbname';- Update dependencies periodically:
# In your local development environment
npm outdated  # Check for outdated packages
npm update    # Update to latest compatible versions
npm audit     # Check for security vulnerabilities
npm audit fix # Fix security issues automaticallyPerformance Optimization Checklist
- Monitor website performance:
- Use Google PageSpeed Insights to test your site
- Check Core Web Vitals metrics
- Monitor loading times after each deployment
- Optimize build process:
- Enable npm cache in GitHub Actions (already configured in the workflow)
- Consider using build caching for faster deployments
- Optimize image assets and file sizes
- Database optimization:
- Review database query performance
- Add indexes for frequently queried fields
- Monitor database connection pool usage
Conclusion and Next Steps
You’ve successfully created a robust deployment pipeline that connects Lovable’s AI-powered development environment with professional hosting through InMotion Hosting. This setup gives you the benefits of rapid development while maintaining the reliability and control needed for production applications.
Your deployment workflow now automatically syncs changes from Lovable to GitHub, builds your React application for production, and deploys updates to your InMotion Hosting account. The database migration from Supabase to PostgreSQL provides you with full control over your application’s data layer.
Moving forward, you can continue developing in Lovable while having confidence that your changes will be deployed reliably to production. The version control integration ensures you have a complete history of your application’s development and the ability to roll back changes if needed.
Consider expanding your deployment pipeline with additional features like staging environments for testing changes before production deployment, automated testing to catch issues before they reach users, and monitoring tools to track your application’s performance and uptime.
The foundation you’ve built supports scaling your application as your needs grow. You can add team members to your development process, implement more sophisticated database features, and take advantage of InMotion Hosting’s scalability options as your user base expands.
This deployment approach represents a professional development workflow that bridges the gap between AI-assisted development and production hosting, giving you the tools to build and maintain sophisticated web applications efficiently and reliably.
Ready to take your web development to the next level? InMotion Hosting’s robust shared hosting platform provides the perfect foundation for your Lovable-created applications. With full Git integration, PostgreSQL support, and expert migration assistance, you can focus on building great applications while we handle the hosting infrastructure.
Leave a Reply